
Introduction
This is a 2-part tutorial that covers spring boot actuator. The first part is an introduction to spring boot actuator, showing a basic exploration of what it offers and how to secure it. The second tackles a few of the endpoints which actuator exposes, showing how to configure these auto-configured endpoints, extending them and writing custom endpoints.
What is spring boot actuator?
Spring boot actuator (actuator for short) is a tool that offers insights into your application. It provides endpoints that let you monitor and interact with your application. It helps you answer questions like: which beans are configured?, which version is running?, how is the application performing and much more.
Setting up Actuator
In order to use actuator, it needs to be added as a dependency to your spring boot project.
<dependency>
    <groupId>org.springframework.boot</groupId>
    <artifactId>spring-boot-starter-actuator</artifactId>
</dependency>
To expose the actuator endpoints via HTTP, you need to add the spring boot web starter dependency
<dependency>
    <groupId>org.springframework.boot</groupId>
    <artifactId>spring-boot-starter-web</artifactId>
</dependency>
Once you have the above dependencies, simply run the following command to be able to view the actuator endpoint.
mvn spring-boot:runAfter you have run the above command, use the following URL to access the actuator endpoint http://localhost:8080/actuator
You will get an output similar to the one below
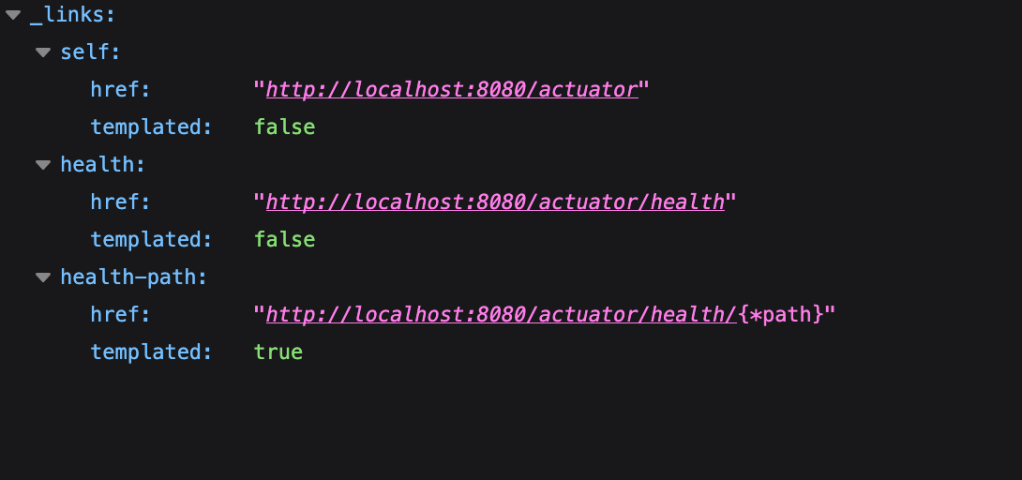
You can see that the actuator endpoint itself appears in the list along two listings of the health endpoint. Accessing the health endpoint returns the following response: {“status”:”UP”} indicating that the service is up.
By default, just the health endpoint is exposed; however, there are several endpoints that are not exposed for security reasons. You can selectively expose endpoints by using the endpoint id (the name of the endpoint) or expose all endpoints. Expose all web endpoints by adding the following to your properties file:
management.endpoints.web.exposure.include=*Now if you access the actuator endpoint, you will see a list of endpoints you can access to see various aspects of your application. Some of the endpoints and their descriptions can be seen in the table below
| ID | Description |
|---|---|
|
Exposes audit events information for the current application. |
|
Displays a complete list of all the Spring beans in your application. |
|
Exposes available caches. |
|
Shows the conditions that were evaluated on configuration and auto-configuration classes and the reasons why they did or did not match. |
|
Displays a collated list of all |
|
Exposes properties from Spring’s |
|
Shows any Flyway database migrations that have been applied. |
|
Shows application health information. |
|
Displays arbitrary application info. |
|
Shows and modifies the configuration of loggers in the application. |
|
Shows ‘metrics’ information for the current application. |
|
Displays a collated list of all |
|
Displays the scheduled tasks in your application. |
|
Lets the application be gracefully shutdown. |
|
Performs a thread dump. |
JMX endpoints can also be configured. For example if you want to expose only health and info endpoints over JMX:
management.endpoints.jmx.exposure.include=health,infoSecuring the endpoints
As already mentioned, by default only the health endpoint is exposed. Furthermore, you actually neither see the details nor the components that make up the health endpoint. We will delve into the details of the endpoint in the second part.
Actuator also has the endpoint “shutdown” that needs to be explicitly exposed through configuration or else it is not exposed. Once exposed, the web endpoint is invoked by way of a POST request. As the name implies, it will shut down the application
management.endpoint.shutdown.enabled=trueThe actuator port can be changed. Let’s change it:
management.server.port=8081When the above is done, actuator is then accessible just on port 8081: http://locahlhost:8081/actuator
You can also change the name of the actuator base endpoint
management.endpoints.web.base-path=/manageThe actuator base endpoint will then be http://locahlhost:8081/manage. The info endpoint will be http://locahlhost:8081/manage/info.
The actuator endpoint can also be configured so that it is accessed only locally:
management.server.address=127.0.0.1Once you have spring security dependency in your path, the actuator endpoints will automatically require a user to be authenticated.
<dependency>
  <groupId>org.springframework.boot</groupId>
  <artifactId>spring-boot-starter-security</artifactId>
</dependency>
Add the following in order to be able to login:
@Configuration
public class AppConfig {
    @Bean
    public InMemoryUserDetailsManager userDetailsService() {
        UserDetails user =  User.withDefaultPasswordEncoder()
                                .username("user")
                                .password("user")
                                .roles("USER")
                                .build();
        UserDetails admin =  User.withDefaultPasswordEncoder()
                                 .username("admin")
                                 .password("admin")
                                 .roles("USER", "ADMIN")
                                 .build();
        return new InMemoryUserDetailsManager(user, admin);
    }

}
You can configure access to the actuator endpoints such that only a user with the role “ENDPOINT_ADMIN” can access the actuator endpoints. Add the following to the config class
	@Bean
	public SecurityFilterChain chain(HttpSecurity http) throws Exception {
		http.securityMatcher(EndpointRequest.toAnyEndpoint());
		http.authorizeHttpRequests((requests) ->     requests.anyRequest().hasRole("ENDPOINT_ADMIN"));
		http.httpBasic(withDefaults());
		return http.build();
	}
Add a user with “ENDPOINT_ADMIN” role or simply add the role to an existing user. Now only a user with that role can access the actuator endpoints. “EndpointRequest.toAnyEndpoint()” maps to the actuator endpoint.
Conclusion
In this first path we have seen what actuator is and had an overview of some of the auto-configured endpoints as well as how to secure the actuator endpoints. In the next tutorial, we will see how to configure a few of the endpoints to get more out of them beyond the default configurations. We will also see how to write custom endpoints. The example project can be viewed here: https://bitbucket.org/teamkribisoft/actuator.

Leave a reply to Spring Boot Observability – Code Major Cancel reply